
In Microsoft Excel, we have not found any default printing setting or tool to print huge data in presentable formats. Therefore we have found some tips to better optimize page print in Excel which mentioned below:
Tips:
01: How to Print Gridlines.
02: How to Set a Print Area.
03: How to Center a Page Horizontally and Vertically.
04: How to Scale a Page.
05: How to Repeat Top Rows on Every Print Page.
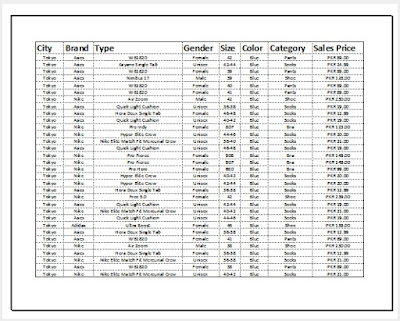
Tip # 1: How to Print Gridlines in Excel
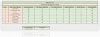
In Microsoft Excel, when we go to the Print Preview window by pressing Ctrl+P, you see that it is very difficult to tell that which cell belong to which row or column etc. Because in Microsoft Excel we do not have any default Girdline settings. as mentioned in below Preview:

In Microsoft Excel, we have a good command to organize data separately through configuration of Gridline.
By using below mentioned steps, you can easily add Gridlines in Excel:
Step 1: Open your Excel Sheet and Press Ctrl + P.

Step 2: Now Click on Page Setup.

Step 3: In Page Setup window, Click on Sheet tab.

Step 4: In Print section, Tick on Gridlines and Press OK to save the configuration.

Now you can see the result as mentioned in below snapshot.
Tip # 2: How to Set a Print Area
If you are using Microsoft Excel spread sheet for maintaining your data bank. But you don't want to print all your data, so in Microsoft Excel you can easily Set the Print limit that you want to print.
By following below mentioned steps, you can easily Set a Print Area:
Step 1: Select your Desired print area on Excel Spread sheet.

Step 2: Now click on Page layout tab.
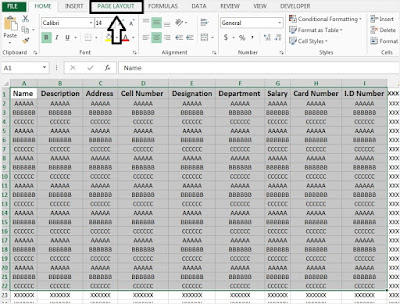
Step 3: In Page Setup group, Click on Print Area and Select Set Print Area.

Now you can see that Print Area has been set as mentioned in below snapshot:

Tip # 3: How to Center a Page Horizontally and Vertically
In Microsoft Excel, you can set easily center a page horizontally and vertically by using the Page Setup option.
By following below mentioned set can easily center a page:
Step 1: Open your Microsoft Excel spreadsheet and Click on Page Layout.

Step 2: In Page Setup group, Click on Margin.

Step 3: In Center on page section, Tick on Horizontally and Vertically and Press OK to Close Page Setup window.

for verification Press Ctrl + P to see the result as mentioned below snapshot:

Tip # 4: How to Scale a Page
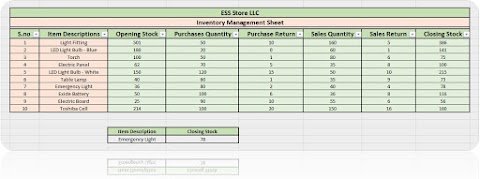
If you have a so many columns in Excel spread sheet and you want to print all your columns in one page so don't worry. You can easily reduce the size of your spreadsheet and fit your data into one page thru Scale to Fit options.
By Following below mentioned steps you can easily apply Scale to Fit Option:
Step 1: Open your Work Sheet and Press Ctrl + P to Open Print Preview window and Click on Page Setup to open Page Setup window.

Step 2: In Page Setup window, Select Fit to in Scaling section and Click OK to save the setting.

Now you can see the result as mentioned in below snapshot.

Tip # 5: How to Repeat Top Rows on Every Print Page
If you are working with Excel spread sheet and your spreadsheet comprises into more than one page then you could face problem to matched data to specific column title.
Don't worry, In Microsoft Excel we have an option that will repeat this tile automatically.
By following below mentioned steps can easily repeat tile on every print page:
Step 1: Open your Excel Sheet and Press Ctrl + P.

Now we see that on Page # 2, we don't have any page tile as mentioned in below snapshot:

Step 2: Now Click on Page Setup.

Step 3: In Page Setup window. Click on Sheet tab.

Step 4: In Print titles section, Click inside the Rows to repeat at top and select the range of rows that you want to repeat on every printed page and Click OK to save the settings.

Now you can see the result as mentioned in below snapshot of Page # 2:

In Microsoft Excel, when we go to the Print Preview window by pressing Ctrl+P, you see that it is very difficult to tell that which cell belong to which row or column etc. Because in Microsoft Excel we do not have any default Girdline settings. as mentioned in below Preview:

In Microsoft Excel, we have a good command to organize data separately through configuration of Gridline.
By using below mentioned steps, you can easily add Gridlines in Excel:
Step 1: Open your Excel Sheet and Press Ctrl + P.

Step 2: Now Click on Page Setup.

Step 3: In Page Setup window, Click on Sheet tab.

Step 4: In Print section, Tick on Gridlines and Press OK to save the configuration.

Now you can see the result as mentioned in below snapshot.

Tip # 2: How to Set a Print Area
If you are using Microsoft Excel spread sheet for maintaining your data bank. But you don't want to print all your data, so in Microsoft Excel you can easily Set the Print limit that you want to print.
By following below mentioned steps, you can easily Set a Print Area:
Step 1: Select your Desired print area on Excel Spread sheet.

Step 2: Now click on Page layout tab.

Step 3: In Page Setup group, Click on Print Area and Select Set Print Area.

Now you can see that Print Area has been set as mentioned in below snapshot:

Tip # 3: How to Center a Page Horizontally and Vertically
In Microsoft Excel, you can set easily center a page horizontally and vertically by using the Page Setup option.
By following below mentioned set can easily center a page:
Step 1: Open your Microsoft Excel spreadsheet and Click on Page Layout.

Step 2: In Page Setup group, Click on Margin.

Step 3: In Center on page section, Tick on Horizontally and Vertically and Press OK to Close Page Setup window.

for verification Press Ctrl + P to see the result as mentioned below snapshot:

Tip # 4: How to Scale a Page
If you have a so many columns in Excel spread sheet and you want to print all your columns in one page so don't worry. You can easily reduce the size of your spreadsheet and fit your data into one page thru Scale to Fit options.
By Following below mentioned steps you can easily apply Scale to Fit Option:
Step 1: Open your Work Sheet and Press Ctrl + P to Open Print Preview window and Click on Page Setup to open Page Setup window.

Step 2: In Page Setup window, Select Fit to in Scaling section and Click OK to save the setting.

Now you can see the result as mentioned in below snapshot.

Tip # 5: How to Repeat Top Rows on Every Print Page
If you are working with Excel spread sheet and your spreadsheet comprises into more than one page then you could face problem to matched data to specific column title.
Don't worry, In Microsoft Excel we have an option that will repeat this tile automatically.
By following below mentioned steps can easily repeat tile on every print page:
Step 1: Open your Excel Sheet and Press Ctrl + P.

Now we see that on Page # 2, we don't have any page tile as mentioned in below snapshot:

Step 2: Now Click on Page Setup.

Step 3: In Page Setup window. Click on Sheet tab.

Step 4: In Print titles section, Click inside the Rows to repeat at top and select the range of rows that you want to repeat on every printed page and Click OK to save the settings.

Now you can see the result as mentioned in below snapshot of Page # 2:

---Thank You---


0 Comments