
In Microsoft Excel, you can easily save your time and efforts for sending large amount of mails to your employees, family member or others by using a Mail Merge, which will help you to create custom letter easily in Microsoft Word just by merging your Excel information data bank.
By following below mentioned steps, you can easily use the Mail Merge in Excel:
Step 1: First Create or compose a Letter on Microsoft Word, that you want to sent to your all Employees as mentioned below:

You can see on above letter that, Your required field is in brackets just for your information. Before using this letter please remove brackets with value as mentioned in below snapshot.

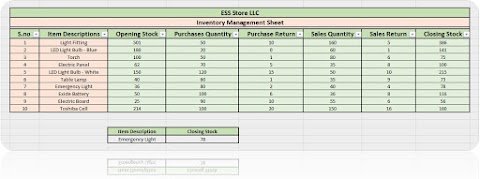
Step 2: Now Next Steps is to Create Excel based data bank which contains information that you want to include in customized letter such as Name, Mailing Addresses, Designation etc as mentioned below:

Step 3: Now Open your Letter in Microsoft Word. Click on Mailings tab. In Start Mail Merge group, Click on Letter.

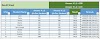
Step 4: Now Click on Select Recipients on Start Mail Merge group and then Select Use an Existing List to open Select Data Source window as mentioned below.

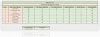
Step 5: In Select Data Source window, Select your Excel based data sheet and click Open.

Step 6: Now in Select Table window, Select your Excel based data sheet and Tick on First row of data contains column headers and Press OK.

To check your created Recipient List, Click on Edit Recipient List in Start Mail Merge group as mentioned below:

Step 7: To insert the Recipients data in Invitation letter, First Click on your desired place and then Click on Insert Merge Field in Write and Insert Fields group and Select your desired field in drop down menu as mentioned below:

Now you can see that, Merge fields has been inserted in Invitation letter as mentioned below:

Step 8: To make sure that your required Recipients data are correctly insert in this letter. Click on Preview Results button on Preview Result group.

Now you can see that your merge recipient list working properly by clicking left and right arrow.

Step 9: Now Click on Finished & Merge on Finish group. In drop down menu, Select Print Documents to Open Merge to Print window.

Step 10: In Merge to Print window, Select All and press OK.

Step 11: Now close your Print window if you don't want to print and Ctrl+S to save your Mail Merge file.


Step 4: Now Click on Select Recipients on Start Mail Merge group and then Select Use an Existing List to open Select Data Source window as mentioned below.

Step 5: In Select Data Source window, Select your Excel based data sheet and click Open.

Step 6: Now in Select Table window, Select your Excel based data sheet and Tick on First row of data contains column headers and Press OK.

To check your created Recipient List, Click on Edit Recipient List in Start Mail Merge group as mentioned below:

Step 7: To insert the Recipients data in Invitation letter, First Click on your desired place and then Click on Insert Merge Field in Write and Insert Fields group and Select your desired field in drop down menu as mentioned below:

Now you can see that, Merge fields has been inserted in Invitation letter as mentioned below:

Step 8: To make sure that your required Recipients data are correctly insert in this letter. Click on Preview Results button on Preview Result group.

Now you can see that your merge recipient list working properly by clicking left and right arrow.

Step 9: Now Click on Finished & Merge on Finish group. In drop down menu, Select Print Documents to Open Merge to Print window.

Step 10: In Merge to Print window, Select All and press OK.

Step 11: Now close your Print window if you don't want to print and Ctrl+S to save your Mail Merge file.

---Thank You---


1 Comments
Amazing Blog. Very easy to follow
ReplyDelete